


Post by EG on Mar 18, 2014 0:31:28 GMT
I made this a while ago and thought some of you lot might find it useful. 
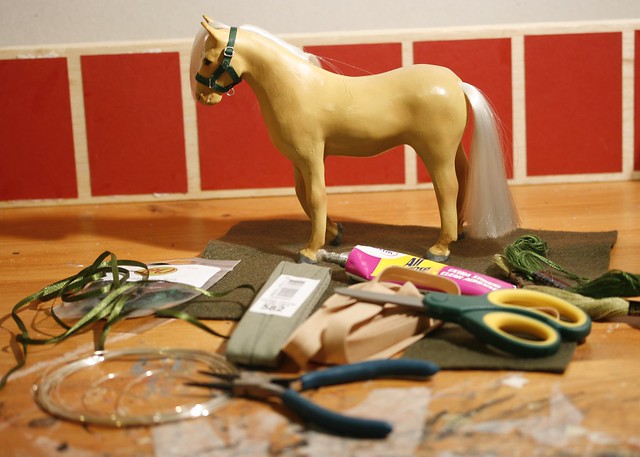
First of all, you will need...
Felt. (I'm only going to be concentrating on felt for this one but you can of course use fabric as well)
Bias Binding. (You can get this from most haberdashery shops or buy online. Wide ribbon works just as well if you don't have any)
Glue. (I use 'Bostik All Purpose')
Ribbon/leather for straps. (I used fake leather ribbon in the end so it's not visible in this pic)
Needle and thread. (I used a single strand of embroidery thread as I couldn't find my normal sewing stuff in the right colour. XD)
Wire. (for making buckles - disregard if you have premade Rio Rondo ones or alternative fastenings)
Pliers. (for making buckles/holding stuff together etc)
Scissors. (I don't think I need to tell you what those do lol)
A horse to wear it!
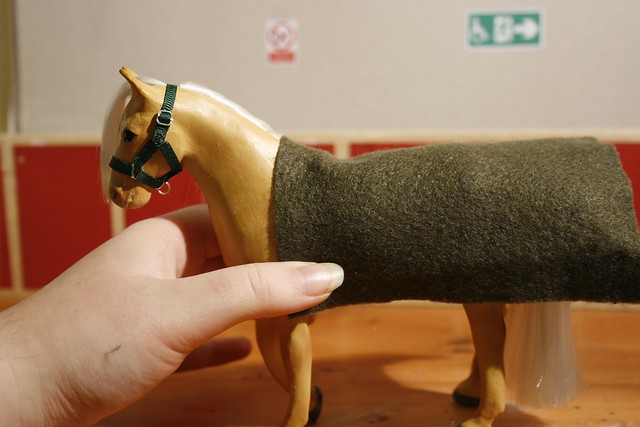
First things first, make a pattern. If you already have a rug which fits well then use that but if not use a scrap of felt or tissue and draw around your model and keep trying it on until it fits snugly.
This is a very basic rug but it's one of my favourites and fits Cally well so it was perfect to use as a reference.
I drew around it and cut it out - ignoring the neck slot as I want to do that again so it looks nicer.

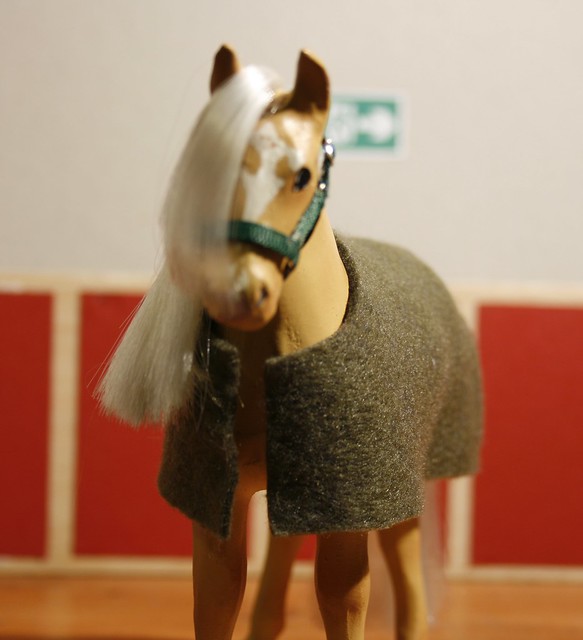
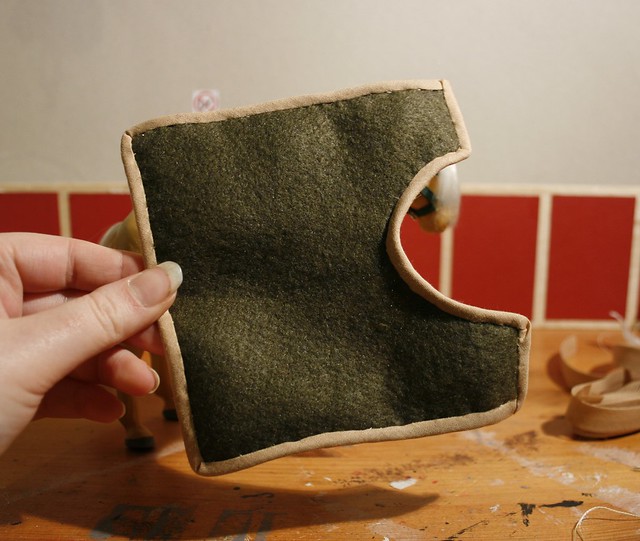
We now have a basic square of felt so after checking that it's wide enough to wrap around her nicely, I cut a new neck for it.
Don't cut it too much or it'll end up really low which looks a bit silly! Make sure there's enough left at the chest and shoulders. (or you'll need to make one of those neck hood things to keep them warm!)


Perfect!
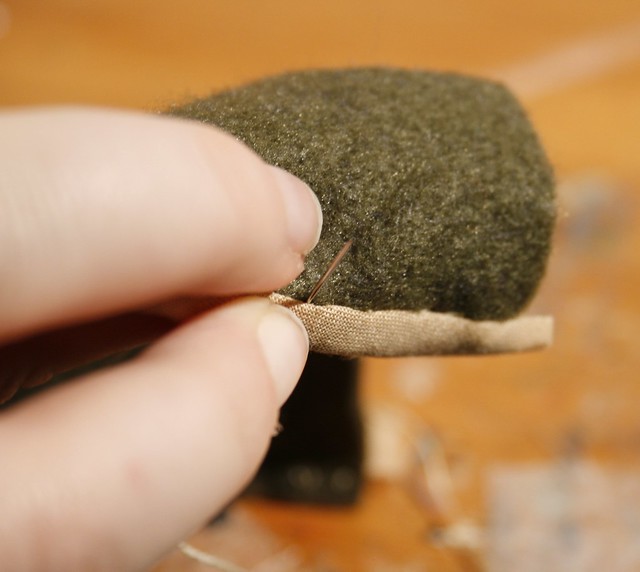
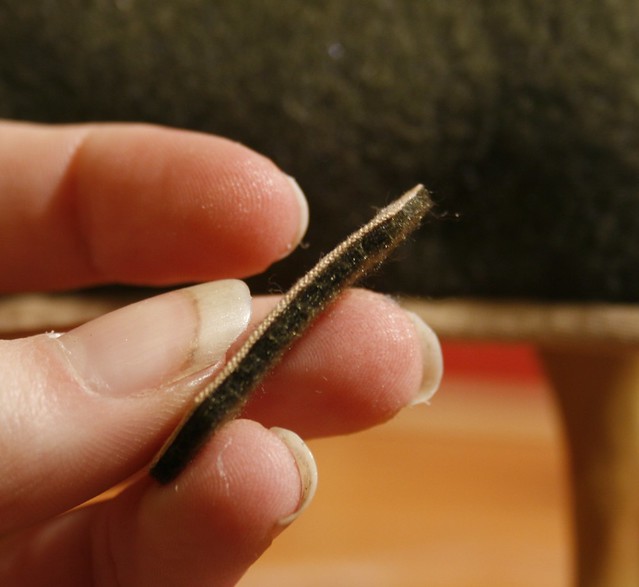
Now we unwind the bias binding and lay out how much we'll need. Always allow more than necessary in case you've measured wrongly!
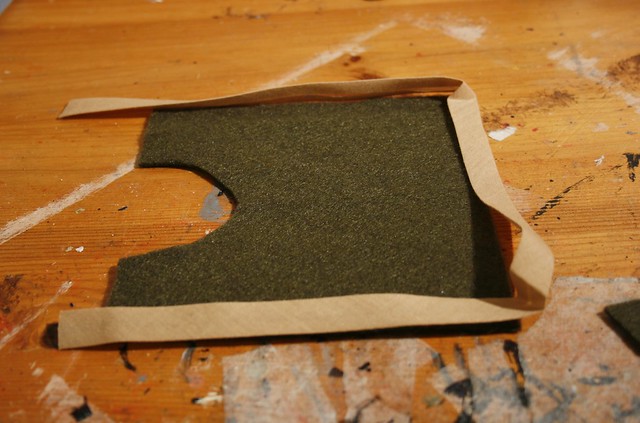
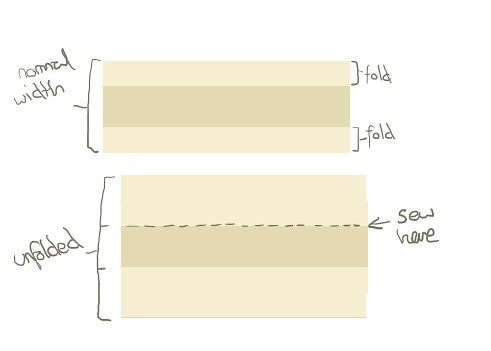
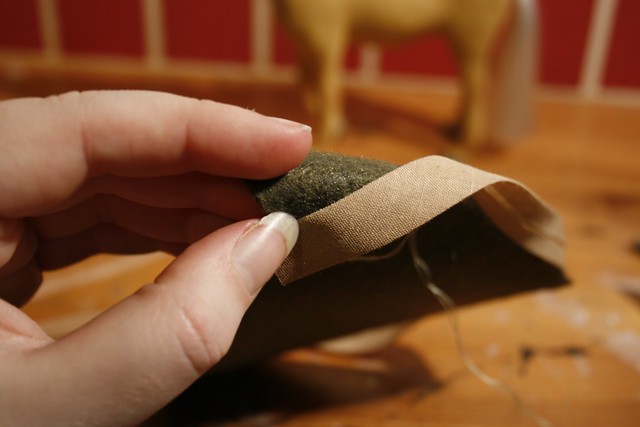
Bias Binding has two folds on the underside so that when you unfold it it makes a [ shape.
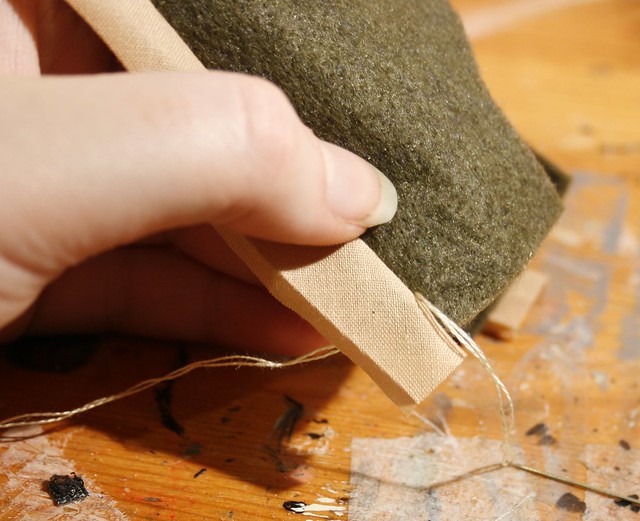
Sewing it on is difficult to explain but basically you want the crease where it's folded to be where you sew.
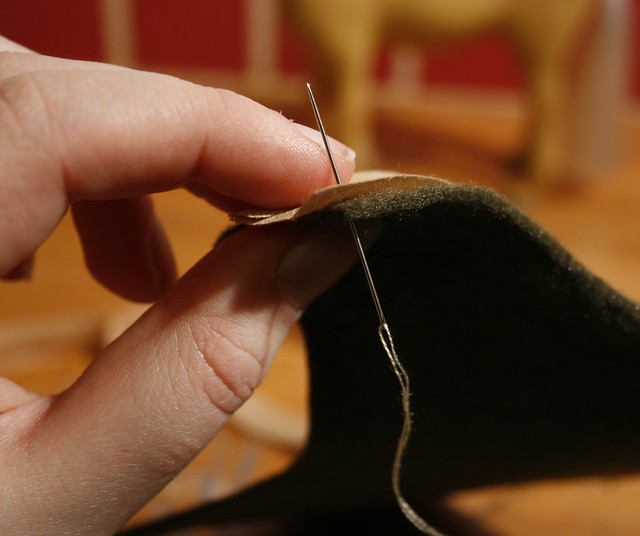
Once you've sewn a little way in, folding the binding over will show you the effect. Hidden stitches!
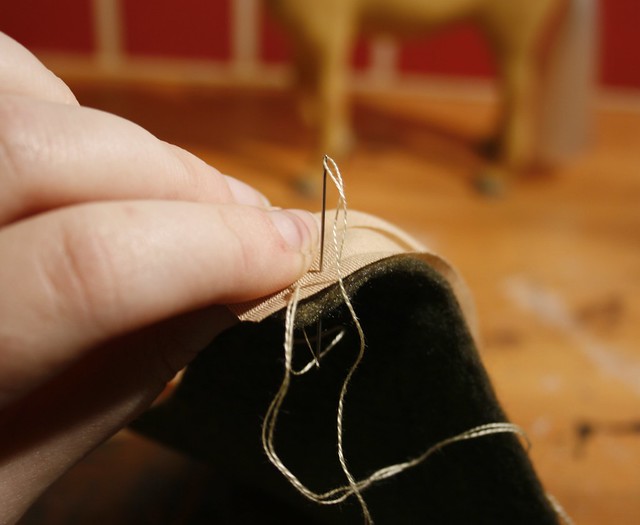
Here's the underside, which will hopefully make more sense than my terrible explainations!
When you get to a corner, keep sewing until nearly the end, then turn the binding at right angles and continue on. It's very tricky to begin with and I've only just managed to get it right!

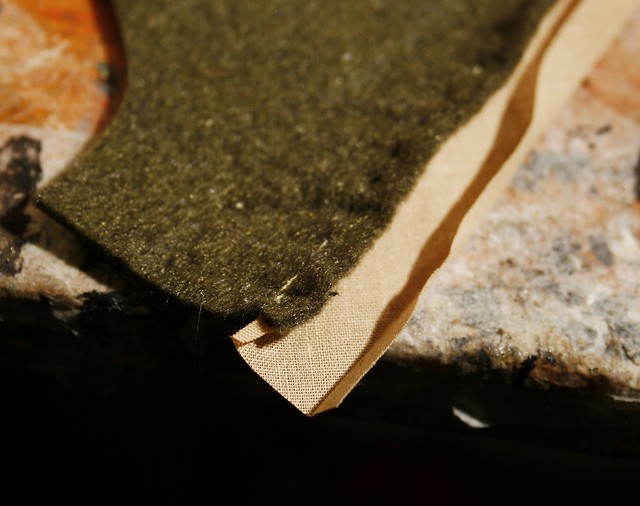
It looks terribly messy at this stage...

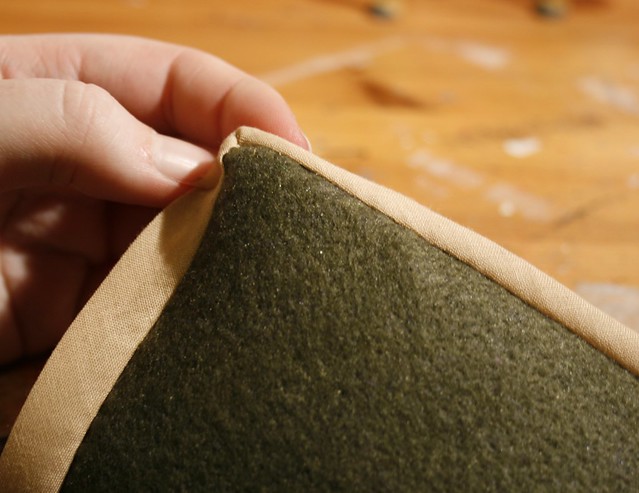
but once you fold it back...

It looks much better!
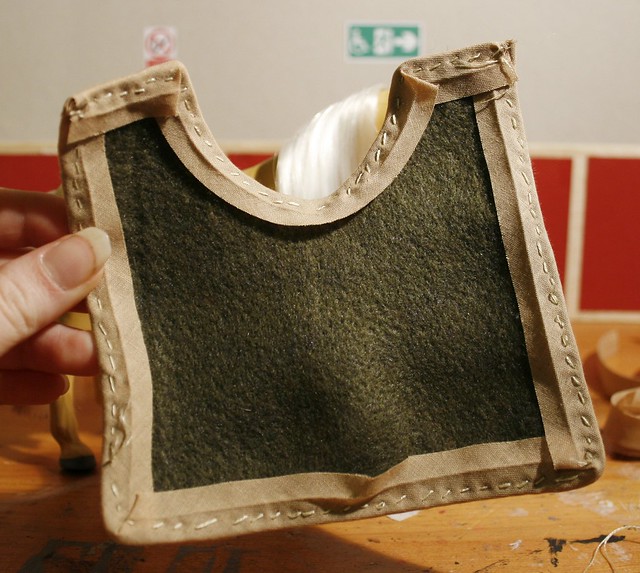
This is what it should look like from the back. (I think I'd trimmed some of the excess)
You can of course do the whole rug in one go but I tend to do the sides and front/neck separately in case I mess it up and make a mistake.
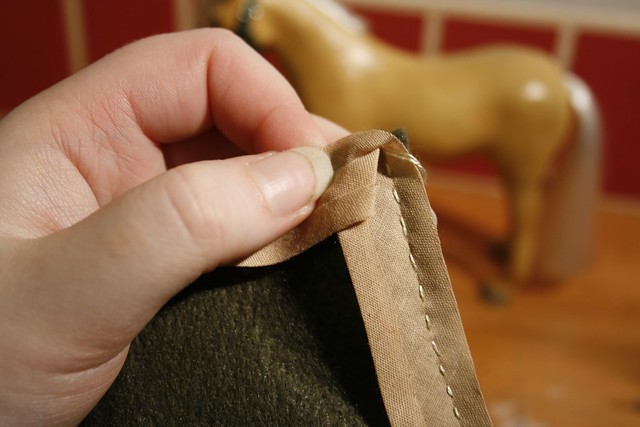
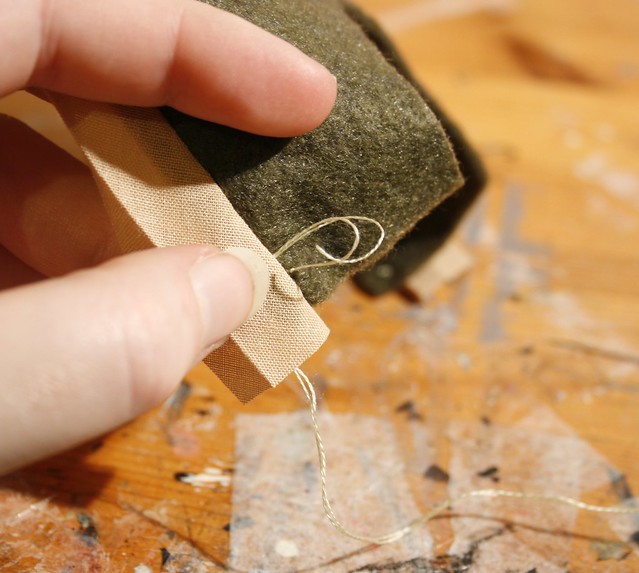
Now comes the really tricky bit, folding the other side over and stitching it in such a way that you can't see how it's held together.
Fold over the binding and hold it tightly, then, sewing from the underside, bring the needle up through the felt as close to the binding as you can. I find it easiest if you aim between the stitches you made the first time around. That way you can sew underneath the binding and thus, create hidden stitches. Or, if you want to do it properly, make your stitches into the thickness of the felt so they don't show through on the 'good side' at all!
You can see how the thread passes up through the felt and back underneath the binding with a minimal amount of it showing.
Pictures speak louder than words I think. XD
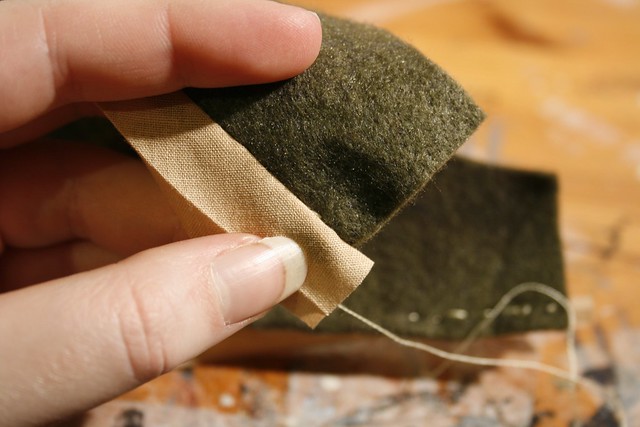


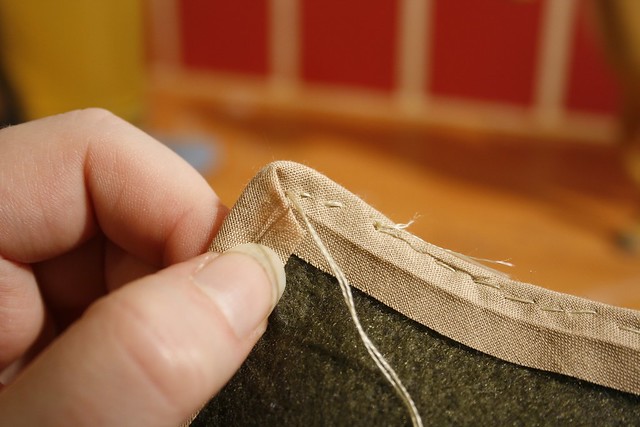
As you can see I wasn't quite as neat in places as I'd have liked but it'll do!
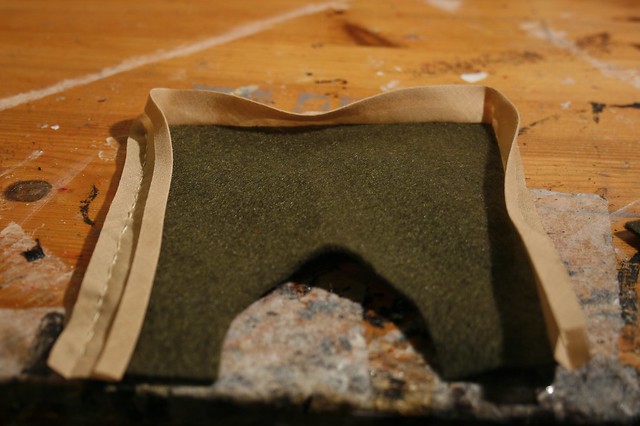
Now, do the same for the chest and neck parts.
When doing curved bits like the neck I find it easiest to keep the fold part parallel to the edge of the felt - that way you won't go off course and end up with randomly thick/thin edges.
The underside always looks awful but the good part is that you never see it so it doesn't matter! I usually trim off the worst of the overlapping binding for neatness sake but you don't need to.
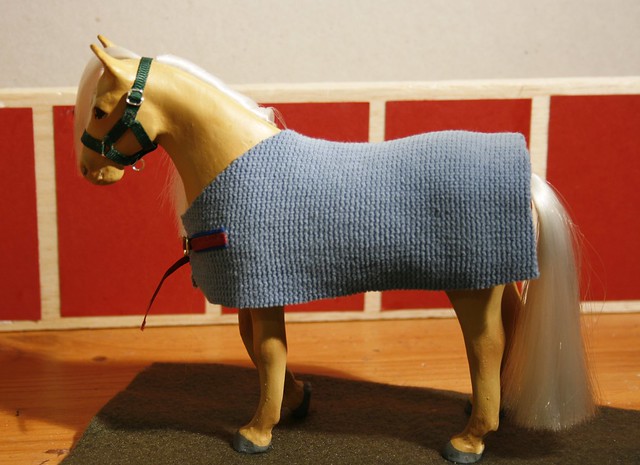
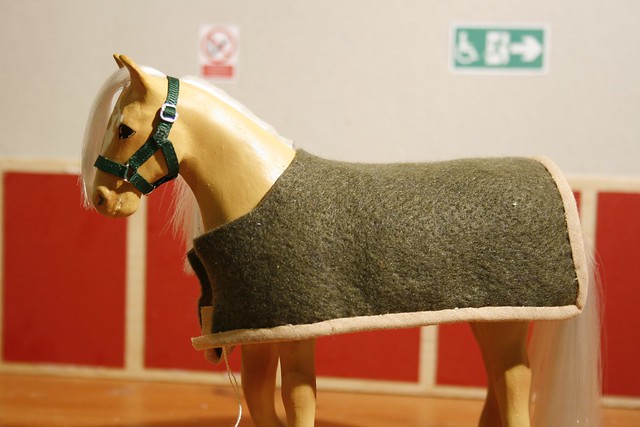
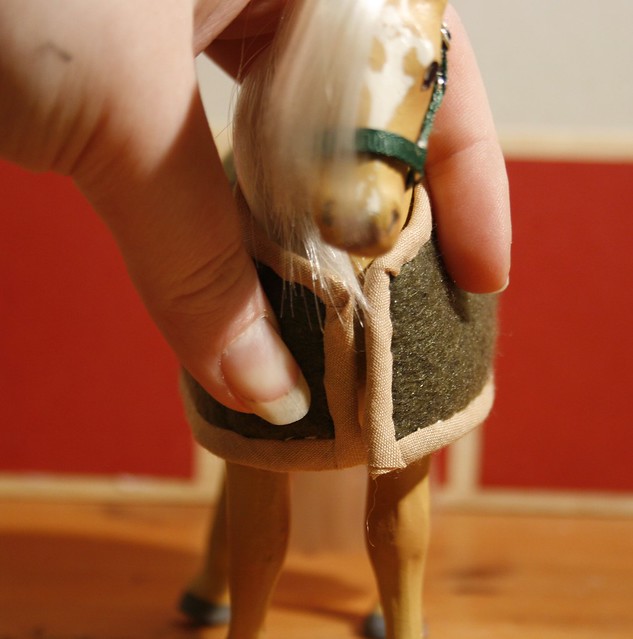
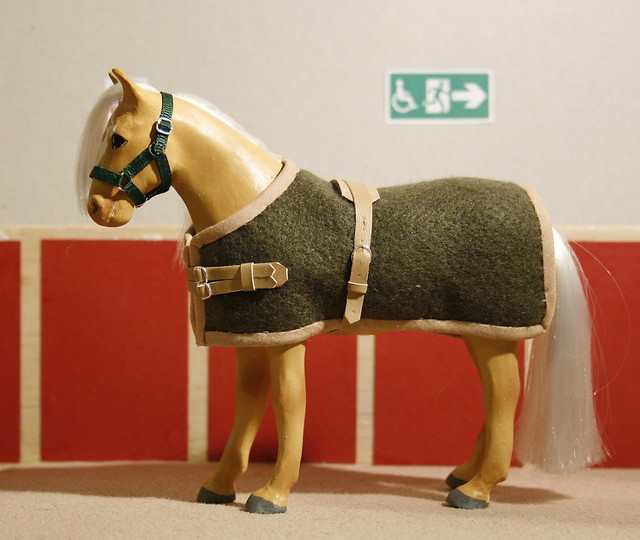
Last minute fitting to make sure it's not too tight or loose.
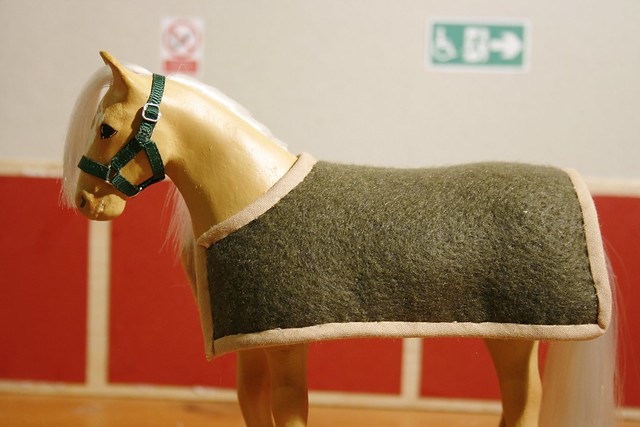
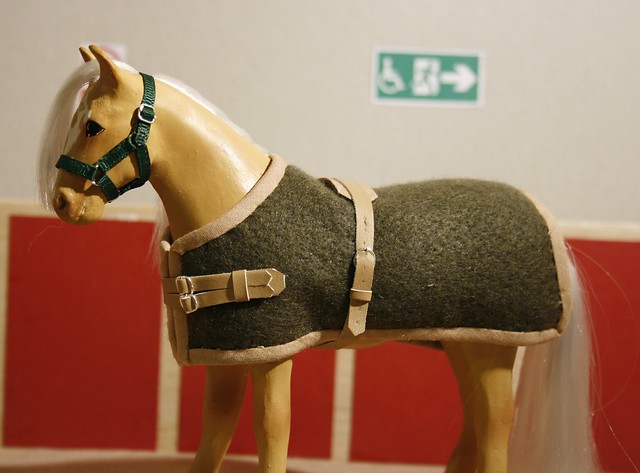
Yup, everything's looking good so far!
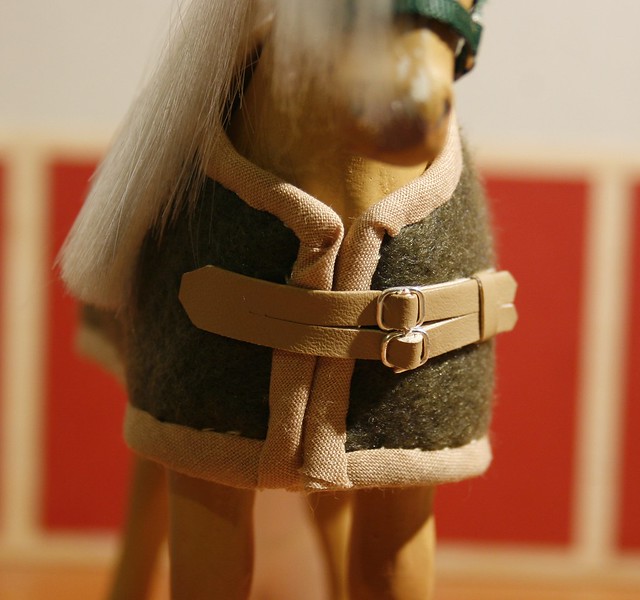
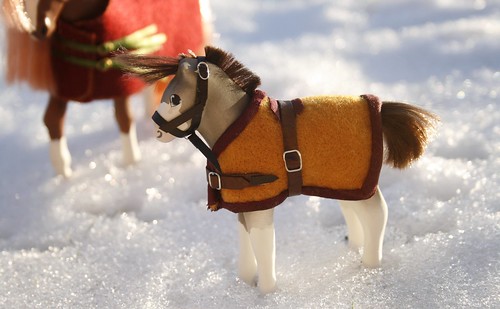
Now onto my favourite part - the fastenings!
I use buckles or clasps as I can make them really easily with pliers but you could use poppers or velcro if you prefer.
I made the chest straps from some fake leather ribbon I bought recently. Normally I have two separate straps but I fancied doing something a bit different today.
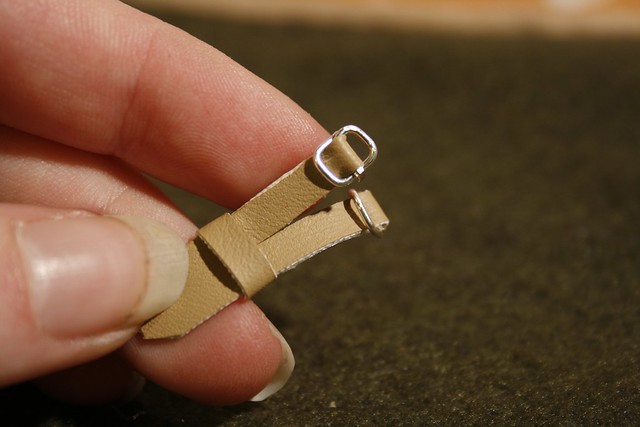
Always make the straps longer than you think you'll need as there's nothing worse than spending ages making and gluing them on, only to find that they won't reach the buckles!
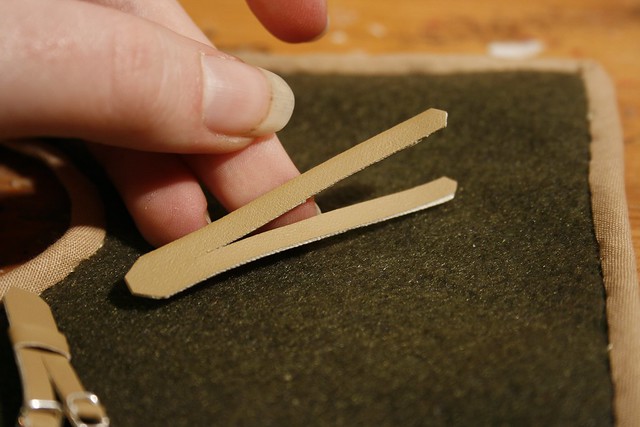
To avoid that, I run the straps through the buckles first, glue on the buckle part, then the strap part so I know that everything's the right length. You can always trim the straps a little afterwards but you can't add more on!
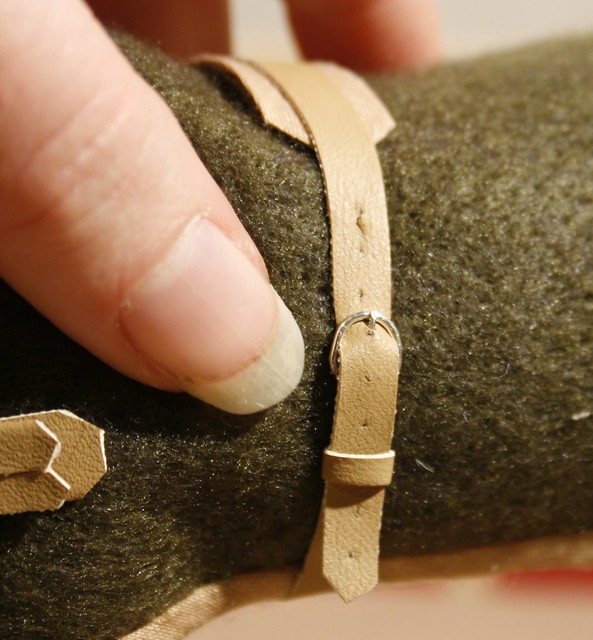
The keeper is just a thinner bit of leather glued behind the other part. It's just a little detail but I think it adds to the overall look.
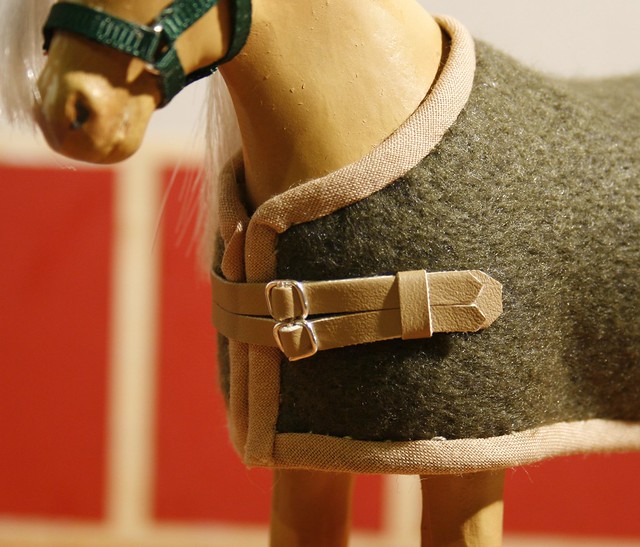
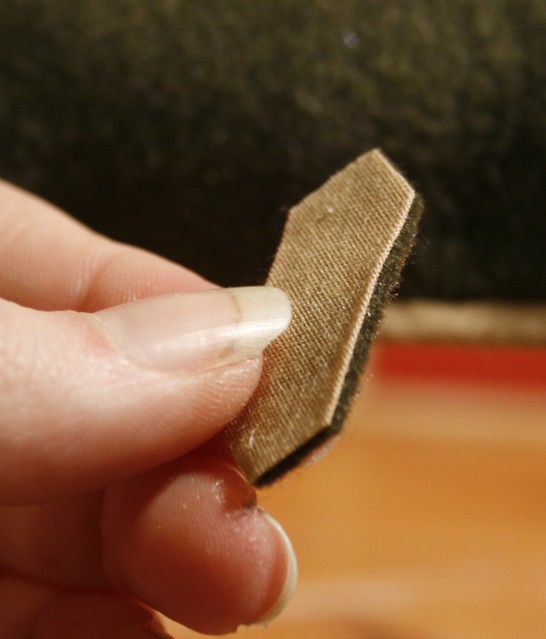
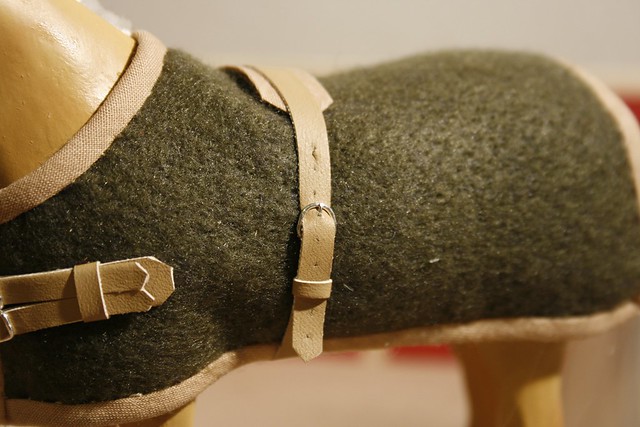
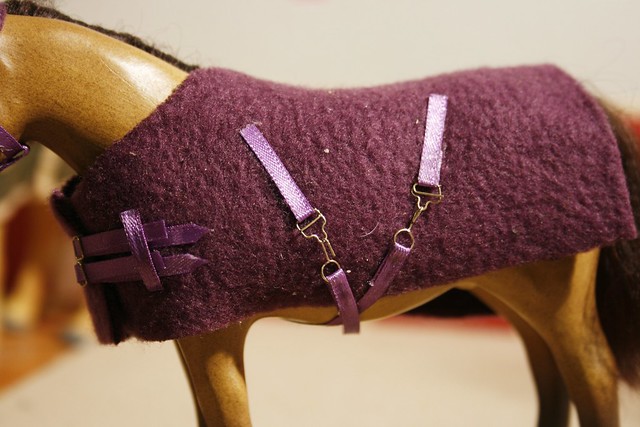
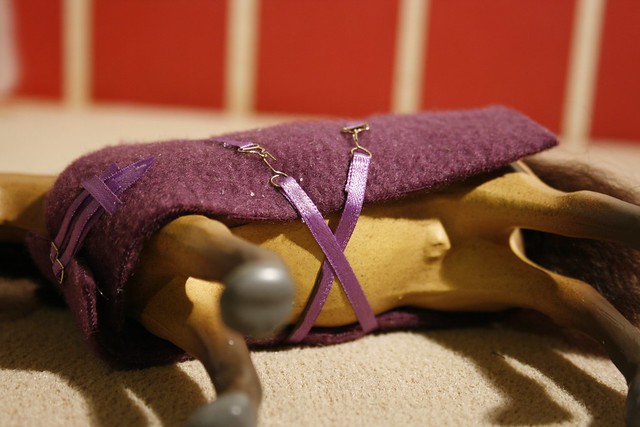
As this is going to be a stable rug, I thought I'd make it with a surcingle instead of the usual cross straps. I used a little section of bias binding glued onto some spare felt for this. I always notch it at the ends just because...well, I think it looks nice.
The girthy part is just another long section of ribbon with a buckle glued on at one end. I felt like being a little different again so this one fastens with an actual proper working tongued buckle. (Which I wouldn't recommend on small things as it's a right faff!)
Once I've got it arranged in the right place I marked off where it sat on the pad and glued it on. You don't need to glue it but as I always lose the pads I did it out of practicality!
And that's it!
If you want cross straps instead then make two long straps with buckles/fastenings and two longer ones and glue them on at a slight angle so they point towards the opposite side of the rug.
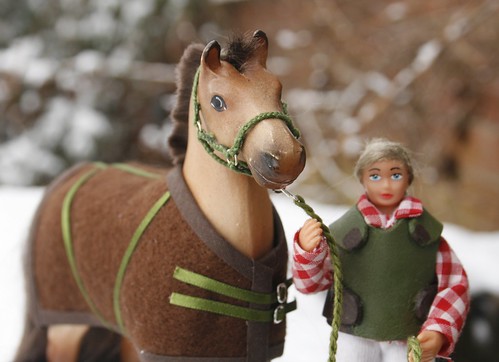
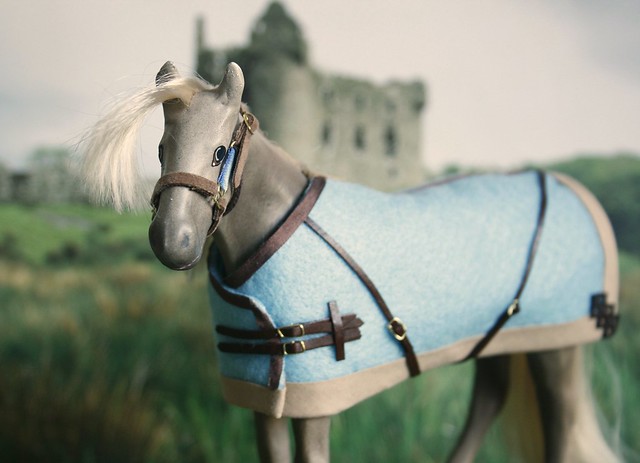
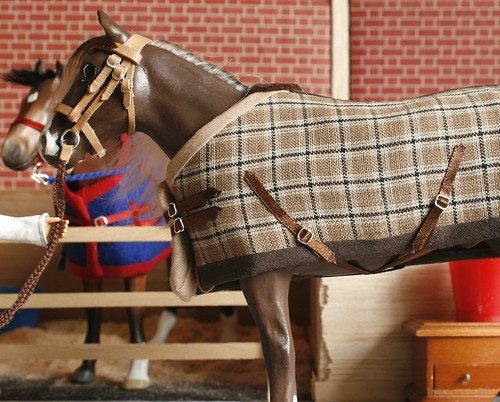
Look at the real thing as much as you can and consult tack catalogues for new ideas. There's so many different styles and designs out there that you can get away with practically any colour/pattern combination! Here's a few examples of what I've come up with for my lot to give you some ideas.
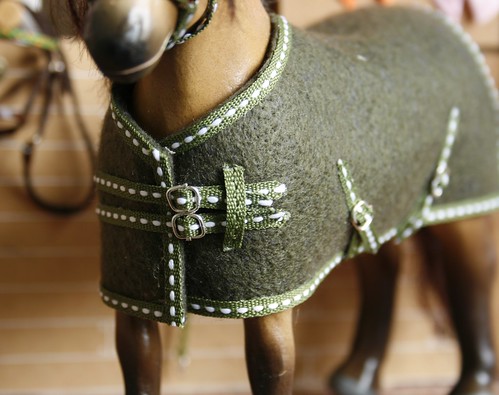

Note the two toned binding.
Anyway, apologies for my terrible descriptions - I'll make a video next time! XD

First of all, you will need...
Felt. (I'm only going to be concentrating on felt for this one but you can of course use fabric as well)
Bias Binding. (You can get this from most haberdashery shops or buy online. Wide ribbon works just as well if you don't have any)
Glue. (I use 'Bostik All Purpose')
Ribbon/leather for straps. (I used fake leather ribbon in the end so it's not visible in this pic)
Needle and thread. (I used a single strand of embroidery thread as I couldn't find my normal sewing stuff in the right colour. XD)
Wire. (for making buckles - disregard if you have premade Rio Rondo ones or alternative fastenings)
Pliers. (for making buckles/holding stuff together etc)
Scissors. (I don't think I need to tell you what those do lol)
A horse to wear it!
First things first, make a pattern. If you already have a rug which fits well then use that but if not use a scrap of felt or tissue and draw around your model and keep trying it on until it fits snugly.
This is a very basic rug but it's one of my favourites and fits Cally well so it was perfect to use as a reference.
I drew around it and cut it out - ignoring the neck slot as I want to do that again so it looks nicer.
We now have a basic square of felt so after checking that it's wide enough to wrap around her nicely, I cut a new neck for it.
Don't cut it too much or it'll end up really low which looks a bit silly! Make sure there's enough left at the chest and shoulders. (or you'll need to make one of those neck hood things to keep them warm!)
Perfect!
Now we unwind the bias binding and lay out how much we'll need. Always allow more than necessary in case you've measured wrongly!
Bias Binding has two folds on the underside so that when you unfold it it makes a [ shape.
Sewing it on is difficult to explain but basically you want the crease where it's folded to be where you sew.
Once you've sewn a little way in, folding the binding over will show you the effect. Hidden stitches!
Here's the underside, which will hopefully make more sense than my terrible explainations!
When you get to a corner, keep sewing until nearly the end, then turn the binding at right angles and continue on. It's very tricky to begin with and I've only just managed to get it right!
It looks terribly messy at this stage...
but once you fold it back...
It looks much better!
This is what it should look like from the back. (I think I'd trimmed some of the excess)
You can of course do the whole rug in one go but I tend to do the sides and front/neck separately in case I mess it up and make a mistake.
Now comes the really tricky bit, folding the other side over and stitching it in such a way that you can't see how it's held together.
Fold over the binding and hold it tightly, then, sewing from the underside, bring the needle up through the felt as close to the binding as you can. I find it easiest if you aim between the stitches you made the first time around. That way you can sew underneath the binding and thus, create hidden stitches. Or, if you want to do it properly, make your stitches into the thickness of the felt so they don't show through on the 'good side' at all!
You can see how the thread passes up through the felt and back underneath the binding with a minimal amount of it showing.
Pictures speak louder than words I think. XD
As you can see I wasn't quite as neat in places as I'd have liked but it'll do!
Now, do the same for the chest and neck parts.
When doing curved bits like the neck I find it easiest to keep the fold part parallel to the edge of the felt - that way you won't go off course and end up with randomly thick/thin edges.
The underside always looks awful but the good part is that you never see it so it doesn't matter! I usually trim off the worst of the overlapping binding for neatness sake but you don't need to.
Last minute fitting to make sure it's not too tight or loose.
Yup, everything's looking good so far!
Now onto my favourite part - the fastenings!
I use buckles or clasps as I can make them really easily with pliers but you could use poppers or velcro if you prefer.
I made the chest straps from some fake leather ribbon I bought recently. Normally I have two separate straps but I fancied doing something a bit different today.
Always make the straps longer than you think you'll need as there's nothing worse than spending ages making and gluing them on, only to find that they won't reach the buckles!
To avoid that, I run the straps through the buckles first, glue on the buckle part, then the strap part so I know that everything's the right length. You can always trim the straps a little afterwards but you can't add more on!
The keeper is just a thinner bit of leather glued behind the other part. It's just a little detail but I think it adds to the overall look.
As this is going to be a stable rug, I thought I'd make it with a surcingle instead of the usual cross straps. I used a little section of bias binding glued onto some spare felt for this. I always notch it at the ends just because...well, I think it looks nice.
The girthy part is just another long section of ribbon with a buckle glued on at one end. I felt like being a little different again so this one fastens with an actual proper working tongued buckle. (Which I wouldn't recommend on small things as it's a right faff!)
Once I've got it arranged in the right place I marked off where it sat on the pad and glued it on. You don't need to glue it but as I always lose the pads I did it out of practicality!
And that's it!
If you want cross straps instead then make two long straps with buckles/fastenings and two longer ones and glue them on at a slight angle so they point towards the opposite side of the rug.
Look at the real thing as much as you can and consult tack catalogues for new ideas. There's so many different styles and designs out there that you can get away with practically any colour/pattern combination! Here's a few examples of what I've come up with for my lot to give you some ideas.
Note the two toned binding.

Anyway, apologies for my terrible descriptions - I'll make a video next time! XD


 I only had a really thin leather lace so it's a bit fidgety?