|
|
Post by katie on Jan 31, 2016 17:55:10 GMT
|
|
|
|
Post by EG on Jan 31, 2016 19:51:22 GMT
I love her! She's got a really kind face. :3 I'm loving the room in the last pic too, any more pics?
I find making boots incredibly tiresome and at some point I'd like to make a mould so I don't have to do them from scratch every time!
|
|
|
|
Post by astudyinscarlet on Feb 2, 2016 16:59:37 GMT
She's really nice.  If I don't use dolls house wellies (which I sometimes do. They're not great but they are reasonably inexpensive so...) on my customised dolls house riders I use black milliput for making their boots, then I don't have to paint them (terracotta milliput would probably look OK for brown boots). I'll probably attempt making riding hats with it at some point too as the dolls house figure riders' heads are way too big for Julip hats and I don't have enough other sized riding hats (I'll wrap them in cling film and then try sculpting the hat over the cling-film wrapped head). |
|
|
|
Post by capriole on Feb 4, 2016 20:19:16 GMT
I haven't tried this for a very long time but my mum used to make riding hats for my dolls by using papier mache technique. She used a ball of plasticine and layered glue soaked paper over it and let it dry. It could be trimmed with scissors and then she covered it with very fine velvet to make the old fashioned hunting caps. I keep meaning to try and make the modern helmets with it but it's just another job I haven't got round to doing yet!
|
|
|
|
Post by Dantelsh on Feb 8, 2016 13:22:05 GMT
lovely rider so sweet
|
|
|
|
Post by katie on Feb 28, 2016 20:46:08 GMT
Thank you for your suggestions! I need to find some time to try them out! I love her! She's got a really kind face. :3 I'm loving the room in the last pic too, any more pics? I find making boots incredibly tiresome and at some point I'd like to make a mould so I don't have to do them from scratch every time! Thank you  The room was in a small corner of a room up against a skirting board, and was really awkward take photos of as it only had one wall! It is currently being refurbished, and I have ordered a room box so that it doesn't have to be taken apart all the time, but when it is finished I will definitely post some photos! |
|
|
|
Post by Wollepluis on Jul 7, 2016 13:36:53 GMT
She's so adorable! And I really love your Fjord (both the Julip one and the pony in your profile pic)! <3 |
|
|
|
Post by kirabouvier on Jan 1, 2018 13:44:31 GMT
Thats amazing, would you be able to share how you made her? I have been trying to look for tutorials on the internet but not found much XD
|
|
|
|
Post by juliporiginals on Jan 1, 2018 20:55:12 GMT
She's lovely and it looks as if Honey approves of her |
|
|
|
Post by katie on Jan 6, 2018 18:50:54 GMT
Thats amazing, would you be able to share how you made her? I have been trying to look for tutorials on the internet but not found much XD Thank you! I made her two years ago, and now I use a slightly different method. I made a rider doll and took some pictures as it is quite hard to explain! I make the body, arms and legs out of pipe cleaners and her head, hands and shoes out of polymer clay that has to be dried in the oven (I use "Fimo" to make my model horse riders.) . I start with the body by wrapping a pipe cleaner around to make a cylinder shape, leaving a little bit sticking out at the top for the neck, that I then squash to the right size and shape. I then cut pipe cleaners for the arms and legs. 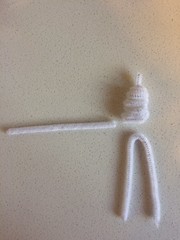 IMG_0900 IMG_0900 by Muddlebarn Yard, on Flickr I push the "legs" inside the cylinder and the arms in between the pipe cleaners on the body and use a hot glue gun to stick them on. 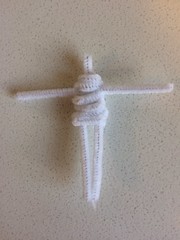 IMG_0905 IMG_0905 by Muddlebarn Yard, on Flickr 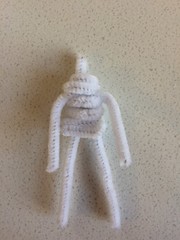 IMG_0913 IMG_0913 by Muddlebarn Yard, on Flickr I then sculpt the head, hands and shoes, with a hole in the clay to insert the pipe cleaners. I dry them in the oven, paint the face and shoes and use a hot glue gun to stick them on. The first doll's face was drawn on with fineliner pens. Now I add details with pencil and pastels and use paint for the eyes. I make the clothes from old material. Her jodhpurs are felt and her jumper was made out of an old sock! I paint the shoes with nail polish as it has a nice shine. 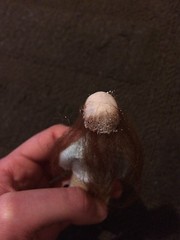 IMG_0922 IMG_0922 by Muddlebarn Yard, on Flickr I used sewing thread for Susie's hair, but now I use mohair or wool roving, as it looks better. I stick small pieces of the "hair" (about the size of the one in the picture below ) to the head with glue until the head is covered. 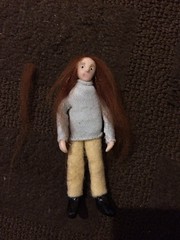 IMG_0929 IMG_0929 by Muddlebarn Yard, on Flickr 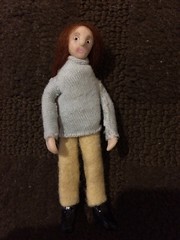 IMG_0934 IMG_0934 by Muddlebarn Yard, on Flickr 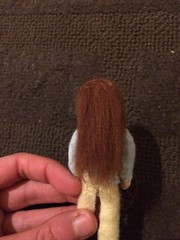 IMG_0953 IMG_0953 by Muddlebarn Yard, on Flickr (Her hair is still a bit damp with glue in the pictures, the glue goes clear when it dries ) 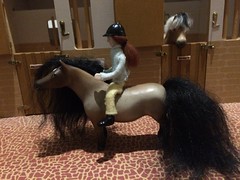 IMG_0986 IMG_0986 by Muddlebarn Yard, on Flickr Here is the finished doll, who I have named Tilly, sitting on Squirrel the pit pony. Hope this helps! |
|
|
|
Post by kirabouvier on Jan 6, 2018 20:21:32 GMT
Thats amazing, would you be able to share how you made her? I have been trying to look for tutorials on the internet but not found much XD Thank you! I made her two years ago, and now I use a slightly different method. I made a rider doll and took some pictures as it is quite hard to explain! I make the body, arms and legs out of pipe cleaners and her head, hands and shoes out of polymer clay that has to be dried in the oven (I use "Fimo" to make my model horse riders.) . I start with the body by wrapping a pipe cleaner around to make a cylinder shape, leaving a little bit sticking out at the top for the neck, that I then squash to the right size and shape. I then cut pipe cleaners for the arms and legs. IMG_0900 by Muddlebarn Yard, on Flickr I push the "legs" inside the cylinder and the arms in between the pipe cleaners on the body and use a hot glue gun to stick them on. IMG_0905 by Muddlebarn Yard, on Flickr IMG_0913 by Muddlebarn Yard, on Flickr I then sculpt the head, hands and shoes, with a hole in the clay to insert the pipe cleaners. I dry them in the oven, paint the face and shoes and use a hot glue gun to stick them on. The first doll's face was drawn on with fineliner pens. Now I add details with pencil and pastels and use paint for the eyes. I make the clothes from old material. Her jodhpurs are felt and her jumper was made out of an old sock! I paint the shoes with nail polish as it has a nice shine. IMG_0922 by Muddlebarn Yard, on Flickr I used sewing thread for Susie's hair, but now I use mohair or wool roving, as it looks better. I stick small pieces of the "hair" (about the size of the one in the picture below ) to the head with glue until the head is covered. IMG_0929 by Muddlebarn Yard, on Flickr IMG_0934 by Muddlebarn Yard, on Flickr IMG_0953 by Muddlebarn Yard, on Flickr (Her hair is still a bit damp with glue in the pictures, the glue goes clear when it dries ) IMG_0986 by Muddlebarn Yard, on Flickr Here is the finished doll, who I have named Tilly, sitting on Squirrel the pit pony. Hope this helps! Thanks so much for sharing this, hopefully I can give this ago myself at some point, probably won't be as nice and detailed as your's but will post a pic when I make one, I love the hair on that one you showed! That pit pony is adorable too! |
|
|
|
Post by happyhoof on Mar 20, 2021 10:47:35 GMT
Oh she is so cute. I am planning on making some riders soon (I love tiny tiny people ). I love all your other bits and pieces too (magazines etc). Can I ask how you made the tiny model horses? Did you mould them from fimo? If so you are very talented. I think mine might look more like elephants lol! |
|
|
|
Post by astudyinscarlet on Mar 20, 2021 12:21:36 GMT
I think those tiny models are Breyer Mini Whinnies. (If you want really tiny model horses look for the ones sold for the model railway set ups, they're ideal as models for Julip sized riders)
|
|
|
|
Post by happyhoof on Mar 25, 2021 14:27:06 GMT
She is lovely. I am planning on making some vintage looking riders and trying to decide on which colour Fimo doll art I should use for their faces. I was thinking sand or beige?
|
|
|
|
Post by helen1983 on Mar 28, 2021 10:22:26 GMT
Wow your riders look brilliant! Her face is lovely I can’t model faces, I find it so difficult! Love her outfits too, I think I might try making a rider soon! Thanks for sharing the tutorial too. |
|


